Below
is a step by step guide on how to use MySiteVideo. Also check
out the product demo video at the bottom of this page that shows
all the steps from start to putting the media widget on your web
pages.
Step 1 - Setting up the template and layout of your widget.
Go
to www.users.mysitevideo.com/login and login with the username,
password and email that you will receive after joining.
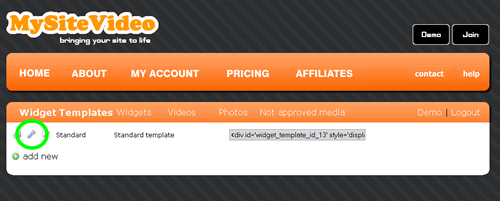
Click
on "Widget Templates" and then click on "add
new".
Enter
a name and description for the template in the boxes and then
click "create". You will then see your template
listed as shown in the screen shot below. Click on the small
spanner icon which is circled in the screen shot.
On
the next page define how you want the template to appear using
the options available:
— Basic widget GUI - Tick this if you want to use the
basic widget. You can see the basic widget on our demo page
with the title Template 2.
— Width - Enter the width in pixels that you want the
widget to be when it is on your site.
— Background Color - Usually you would choose the same
color of the page the widgets will be put on. For example if
I was going to install a widget here I would make the background
white.
— Skin color - This is the color of the control bar that
has the play button on it etc.
— Text color - The color of the title text etc used in
the widget.
— Show rating - Tick this box if you want to allow visitors
to give a star rating for uploaded media.
— Automatically approve submitted media - Tick this if
you want uploaded media to appear on your site straight away
without you checking it first.
— Use video and photo winner functionality - Tick this
if you want to be able to reward uploaded media with medals
as a motivation for customers to upload.
— Max number of media in play list - Enter the maximum
number of videos you want to appear on the play list for example
if you only wanted to show the last six uploads. Alternatively
enter say 999 if you want to display all.
— Max upload file size - An average video is around 2
- 10MB. We recommend entering a figure of around 50MB so that
you do not get massive uploads.
Click
update.
Step
2 - Defining individual widgets
If
you are going to only have one widget on any page of your web
site then you can actually skip this step and go directly to
Step 3. MySiteVideo will actually take the url of the web page
that the widget is on and use this to create new widgets in
the MySiteVideo admin. If however you want to have multiple
widgets on the same page then you can create widgets manually.
This is useful for example if on a product page you want to
have a video upload section and a separate picture upload section
rather than grouping videos and pictures together. You can define
widgets such as Ipod pictures and another one as Ipod videos.
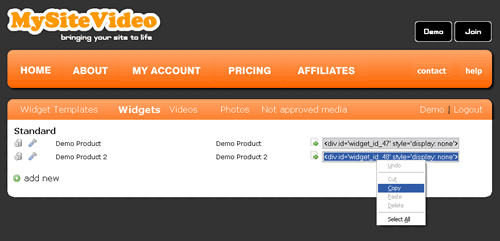
Click
on "Widgets" and then click on "add new".
Enter
a name for example "Ipod Nano Pictures" and then also
enter a description.
Select
which template you want to use from Step 1. You will probably
only have one template but you can setup as many templates as
you like if you want to have different looking widgets on your
site.
Click
"create" and you will then see the widget listed.
The widget will take all the settings from the template used
but you can change these if you need to by clicking on the spanner
icon next to the widget name.
Step
3 - Defining your email address
If
you have set your widgets so that media has to be approved before
appearing on your site you can enter an email address and every
time media is uploaded you will get an email notification so you
can then login and either approve or reject the media. To do this
simply click on your account name which is on the right next to
the logout button and enter your email address.
Step
4 - Automatically copying uploaded videos to Youtube
We
have just added a new feature where videos uploaded can also be
automatically copied to your Youtube account. We recommend you
use this feature as it will create extra traffic to your site.
To use this feature you need to enter a Youtube developer key
into your account. If you want to use this feature and do not
know how to get your youtube developer key please follow these
instructions:
1. Go to http://code.google.com/apis/youtube/dashboard/
2. If you have a google account just sign in. If not you will
need to click on the join link and join which is free.
3. Then you should just see a button saying new product. You enter
a name for the product like mysite video upload and then when
you click save it will generate a long code in the developer key
box.
4. Then in your MySiteVideo account, click on your user name on
the right next to where it says logout and then paste the code
into the box that says youtube developer key. Then enter your
youtube username and password click update.
Step
5 - Putting a widget onto your site
If
you are using just one template on each site page click on "Widget
Templates" and click inside the box that has the code inside
it and copy the code. If however you are using manually defined
widgets click on "Widgets" and click in the code box
next to the widget you want to put on your page and copy the
code.
Open
your site editor such as Dreamweaver and open the page in your
editor that you want to put a widget on. If you are doing this
for the first time and are not used to this kind of thing please
first make a backup of the web page you are inserting the code
into. Click where you want to insert the widget and then go
to the code view and paste the code you copied. Then simply
save the changes and upload the revised page to your server
and the widget will now be on the page.
If
you use a template for all your products then you can just insert
the Widget Template code into your product template once and
then you will not need to do it for each product.
Step
6 - Approving media and awarding winners
If
you have set your account so that media has to be approved before
appearing on your site simply click on "Not approved media"
and you will see a list of pending videos and pictures. You can
preview the media by clicking on the thumbnail and then either
approve it by clicking the tick or reject it by clicking the cross
If
you are using the media rewards and want to award an upload with
a medal then click on "Videos" or "Photos"
and you will see the list of media uploads. Click the medal icon
next to the media you want to award and a medal will now appear
on that media on your widgets. You can also remove any rewards
by clicking on the medal with the minus sign on it. This page
will also show the dates that all media was uploaded and the email
address and name of the customer that uploaded it. This is especially
useful if you have for example a video of the month competition
on your site and want to see which media was uploaded in that
month and then email the winner to give them a prize such as a
money off voucher.
Demo
Video
"MySiteVideo
has made our site much more interesting and interactive. We have
been surprised at how many videos customers are uploading and how
much longer on average visitors now stay on our site. It has certainly
helped to increase our sales and search engine ranking" - www.nitrotek.co.uk